Angular JS Facebook Wall System with Multiple Bindings Tutorial

Today, I am here to introduce a new Advanced Javascript series in 9Lessons.info. Basically, I love wall system because we can cover multiple operations or features in a single web page. 9Lessons.info is most popular for its articles designed on wall system. This article is based on this wall system concept using Angular js 1.4. Future posts will be on the same concept where I will be introducing ReactJS and AngularJS 2 to 9Lessons.info. Below is the demo and hope you all enjoy this new series

Ad Blocker Detector for Blogger with JavaScript

Read more »

How to Create Labels Drop Down Menu In Blogger

How to Create Labels Drop Down Menu In Blogger
In the past, we have shown you how to display labels in Blogger, How to style Labels in Blogger and How to Rename Labels in Blogger. Recently, one of our users asked us about How to create Labels Drop Down Menu in Blogger. If your blog has a lot of labels, then showing a Label widget in your sidebar would take a lot of space. Therefore, a Label or category drop Down menu will easily hold more than hundreds of labels without taking a large space. In this article, we will show you how to create labels drop down menu in Blogger.
Read more �

7 Steps to Get a Verified PayPal Account In Pakistan [UnSupported Countries]

Woho! Finally we were able to get our PayPal verified via Payoneer debit card in Un supported country i.e Pakistan. 

PayPal is an industry standard for online money transactions. Due to the un availability of the great service in Pakistan, it was such a hindrance for us to accept payments from clients and various advertisers.

It was so hard to reject those tempting offers, just due to the non availability of a reputable online transaction service that could act as a bridge to accept payments.


The only thing that kept me pulling back from verifying PayPal via Payoneer debit card was the legitimacy of the process. I doubted if it worked.

payoneer


And trust me, its smooth as silk.

What is PayPal?


PayPal lets you accept or transfer payments online world wide. As its an industry standard, most of the advertisers are comfortable with the service and gives it priority over other services.

paypal

Is Your Country supported?


Here is the list where by you can check if your country is supported in PayPal system.

paypal unsupported countries


Whats the problem with 'PayPay Verification Process' anyway?


The thing is, PayPal isn't avail able in the entire world. They have a set of countries that are unsupported. Once you try making an account at PayPal.com, you would notice that a bunch of countries aren't listed there.

That's the deal.

Why to Verify PayPal Account?

 If you go ahead and apply for PayPal account with any other countries name, you would notice that you would be able to make an account. Though this account would be 'unverified'.

UN-verified PayPal accounts hinder you in few of these ways:

1- Though you can accept payments online (From your sponsors etc by giving away your PayPal ID, i.e your PayPal email address), though you would not be able to withdraw your money from your account.

That is you would never be able to see your hard earned money in your hand. Though you can always use your amounts online.

You can buy a domain online with your unverified PayPal account or order a mac book.

2- Unverified Paypal accounts are restricted to 500$ amount of transactions per month. So you cant make payments more than 500$ online in a month. Once the month ends, you can again use 500$ more anywhere online.

So to pull aside 500$ limit and to be able to withdraw your hard earned money in real life, you need to verify the account.

Hope that clears up the entire cloud of confusions.


What is Payoneer Debit Card?


Payoneer is a great service that provides a debit card service (MasterCard) that is accepted world wide and is also one of the most popular debit card services around.

We would use this debit card to verify our PayPal account.


So How to Get Verified PayPal Account?


There are few simple steps that are involved in the process. These are all the steps that i followed and indeed they worked gracefully.

Step 1: Apply for PayPal Account (Will explain in a bit)
Step 2: Apply for Payoneer Debit card
Step 3: Get Payoneer Approval & Receive debit card
Step 4: Apply for Us Payment Service
Step 5: Enter US Bank Details In PayPal (All is explained later in the post)
Step 6: Make Your First Widrawal
Step 7:Verify PayPal
Step 8: Enjoy and Pray for me :)


Step #1 Apply for PayPal Account


Go to PayPal.com and create an account. Enter your name and all the necessary fields. For Address, search for sample address of US. You can easily get that by search Google. There are tons of address that you can enter in the fields below.

Note that we're creating this PayPal account via US (United States). You can use another verified country, though this is how it works perfectly.

create paypal account


Now when asked for Phone number, do the same and search for sample US telephone numbers. Once done, simply hit 'Agree and Create Account' button.

Now you would be taken to the PayPal main menu/dashboard. You would notice that in the status bar it mentions that the account is 'Unverified'.

Once you would complete the entire process, this would turn up to 'verified'.

Step #2 Apply for Payoneer Debit Card


Go to Get Payoneer Debit Card and signup. Fill in all the details. Once done, you would then be asked to verify your Payoneer account. They do that before shipping you the card its self for your verification.

Payoneer-Prepaid-MasterCard

You would get an email for verification that would lay down the details of how you can verify your account. Most likely they would ask you to upload your ID Card (scanned, or a picture front/back), or a drivers license, passport etc. Any of these would work.

I simply took pictures of the National ID card with my mobile and uploaded the pictures and it worked. (they would tell you the place to upload the document. So there is nothing much to worry)

Step #4 Get Approval


In 3-4 days you would get the email that your Payoneer account has been verified and that they would ship your card to your home (the address that you would give while making the payoneer account).

payoneer approval.jpg


So do give the right information while filling up the Payoneer form. Specially the card holder name. Make sure that it is same as on your National ID card.


 Step #5 Apply for US Payment Service


Us payment Service is a service by Payoneer where by they allow their card holders to get a portion of their US Bank Account.

Basically, to get the PayPal account and get it verified, you require a US bank account. As you dont have that obviously, you would get that via Payoneer US Payment Service.


us payment service


It is actually like a virtual account. Though you don't have the account in reality, Payoneer allocates you (Payoneer Card Holder) a portion of their bank account in US. ( Payoneer have an account in 'First Century Bank' in US.)

So once, you're approved as a card holder in Step#4, you would get an email to apply for US Payment Service if you're interested in receiving money from Companies like PayPal, Amazon etc.

You would simply have to fill in a question are that would require you to answer some simple questions.

Once done, you would submit that form and wait for another 3-4 days. You would than again get an email that your US Payment Service is approved. Your US Bank account details would be emailed to you. ( virtual bank account details).

These details include 'Bank Account#, and 'Securty code'. So by now,  you would have your own virtual bank account (via Payoneer US Payment Service) that you would enter into PayPal bank account verification system to get verified.

So your Payoneer card would represent your First Century Bank account. Every transaction that would be made in your virtual account would be seen in your Payoneer account.

Step #6 Make Your First Widrawl.


Sign into your PayPal account and withdraw around 4-5$ into your bank account. (your virtual First Century bank account). PayPal would ask you to enter your bank account details. This is where you would enter the details sent by Payoneer in the email.

PayPal would then validate your bank account (takes 2-3 seconds) and would transfer the amounts. You would then able to see these '2 transaction' into your Payoneer transaction list with in 1-2 days. these both transaction would be less than a $. (e.g 0.03 and 0.15).

paypal-withdraw-procees


These would just be made to test if you have the control over your bank account. You would then have to login to your PayPal account again and hit 'verify bank account' link on the right side bar.

Then simply enter these 2 amounts that you checked in your Payoneer transaction list. Thats all. It would verify your bank account and thats all! Wolaa!

You now have your very own PayPal verified account.

Step #7 Withdraw all the money that you want


Now simply transfer your PayPal amounts into your bank account (that is your Payoneer card) and use it anywhere in the world MasterCard supported ATMs.

master card atms

In Pakistan, Standard Chartered bank accepts MasterCard.


NOTE: Never enter your Payoneer Card into ATM if it has no amount loaded in it. ATMs would most probably eat up your card. Make sure you load it before using it for withdrawal at ATMs.

Disclaimer: Please note that this way of approving your PayPal account is not very recommended as it involves quite a bit of risk. Your account might get terminated.

Please remember that the use of false information is a violation of the PayPal User Agreement. Violation of the agreement can lead to limitation and/or account closure for all parties involved.


How To Check Whether A Link Is Nofollow Or Dofollow?- The Plugin

dofollow links

Strategies to find out whether a target link is nofollow or dofollow, which matters for SEO purposes.

In Search engine optimization we often come across with the terms like dofollow and nofollow link which are very important SEO terms. You may have seen many websites sharing dofollow blogs list, dofollow forums list or dofollow blog. Many SEO beginners do not know about dofollow or nofollow links. In this article I will enlighten two bigger concepts of nofollow and dofollow.

nofollow vs dofollow what is the difference

Difference between Nofollow and Dofollow Links?


Before starting off, you may like to read:


When a Google bot visit your website it completely analyze your website links, contents etc. While crawling your website/blog Google bots find many links on your website and these links can be of only two types

1- Nofollow links
2- Dofollow links

Dofollow is an HTML property of the tag rel=�dofollow� which tell Search Engine bots to follow this link. Search engine bot visit that page crawl your website and helps to index your site and display the result in search engine via which you get more traffic. While in nofollow tag search engine bot do not follow that link.

backlink juice


In case a link is not equipped with any such tag, it is considered as 'dofollow'.


You may like to read:


By default WordPress and Blogger blogs comment section have nofollow attribute. But both platforms can be made dofollow. In WordPress you can use plugins like Commentluv, keywordluv etc and in blogger you can remove rel=�nofollow� tag from Edit HTML section.

Importance of Dofollow and Nofollow Backlinks?


Dofollow and Nofollow are totally different and opposite to each other and both have their own importance. Dofollow backlinks helps to improve your Page rank and traffic. Nofollow links are not useless. They help you to drive more traffic than dofollow links and helps to improve your Alexa rank.

You may like to read:


How To Check Whether a Link Is Dofollow or Nofollow?


For this purpose you need to install Nodofollow Firefox plugin. It is very useful Firefox plugin for SEO.

You can install this plugin for free from this link

Nodofollow


After installing you will get an option in your right click menu of �nodofollow� Just click it. It will show dofollow links with blue color and nofollow links with red color. See the below picture to get an idea how it will look after enabling nodofollow option blue color is showing that the link is dofollow.

nofollow firefox plugin


Hope you enjoyed this article�

Now you may like to read:

Top 5 Sites That Pay You To Upload Files!

pay to upload


Did you ever imagined an opportunity where a website would pay you to upload files on their system? 


Pay to upload sites have been really in now days and is indeed an easy way to make few bugs online. Its one of those ways to make money online that doesn't need any effort on your part. Each time you upload your files to their servers and someone downloads them, you get paid a certain amount.

This scheme of making money online can be much helpful for those students who tend to have lots of project files, solved assignments etc that others would search. Also this system of making money online is pretty encouraging for teachers and tutors.

They can surely make use of their massive notes collection and upload them to their profiles on these following site. Many students would surely search for them and download.

Who knows it might turn into a passive income for you? Also spreading knowledge is more of a virtue so its a win win situation.

Below are top 5 sites that are work like charm and have a  neat Pay To Upload system.

Bonus AskHassam Episode


#1 ShareCash


They are relatively new in the market though due to their high payouts, they have become one of the best ones out there who pay for uploading files.

sharecash requirments


They offer:

1. High Payouts
2. Helpful Tools
3. Innovative Tools
4. Helpful Tools
5. Reliable


ShareCash upload files to get paid

#2 FileBucks


This is also a new website that started gaining attention lately.


 You basically upload the file and wait for the files and earn money every time they get downloaded. 

Below is how it goes:

Visitor lands on download page and clicks "Download" button. Then, the visitor is showed a survey (which can take between 30secs to a couple of minutes). Once it's filled, visitor gets access to the file.

Normally, the earnings are from 0 to 10$.

#2 Depositfiles.com

Depositfiles pay 25$ per 1000 downloads of of the files that you upload. The files can be video, audio, text files etc.

From Depsitfiles FAQs:

You can upload any file types like EXE, MP3, MPEG, AVI, RAR, ZIP, JPG, etc. Music files, video files, mp3, applications, games, ringtones, office files (e.g. in Excel, PowerPoint, Word, etc) projects, models, architectural drawings, conference recordings, price-lists, regular agreements, laboratory data, server configuration files, advertising booklets and so on. The size of a file you can upload is the maximum in the Internet now up to 2GB!

Join The Program | FAQs


#3 Uploading.com


Uploading.com pay their partners anywhere between 1-100$ for every 1000 downloads of their files. The income per file depends upon the file popularity and file size.

From Uploading.com:

* We pay up to $20 per 1000 unique downloads
* We pay for downloads from many countries
* Daily payments by request!
* Minimum payment is just $30!
* We pay via Epese, Epassporte, Wire Transfer, Webmoney and PayPal


uploading.com get paid to upload files
Join The Program | FAQs


crocko.com get paid to upload files#4 Crocko.com


Crocko.com is another amazing file upload site that pays generously to its users with the rate of approx 1$ per 500 downloads.

The files that are downloaded for more than 60 days are deleted from the servers. Though you can get a premium account for that which would allow you to have 200GB for those dead files to stay on the servers.

For the active files that are downloaded pretty often, there is no limit to storage space, means you can upload as many files as you wish.

Join The Program | FAQs

#5 Shareapic.net

Shareapic.net would pay you to upload pictures to their server. For every 1000 picture views you get paid 0.22$. So its a good deal though it wont make you a living obviously but its another opportunity for to get paid. There are couple of picture sharing platforms like Pictu, Instagram where you might already be signed up. So why not to join a site that would pay you to upload pictures, that you already do?

Join The Program | FAQs


Whats Next?


So yeah guys hope these few sites would surely make your dead files on hard drive a way to make money online. Also buddies, pardon for not posting frequently, my exams are on the way. And my scheduled has been uprooted smile. Much more amazing stuff on the way. Many more interviews. So stay tight and safe.

Peace!

You may like to read:

How to Backup your Blogger Template & Restore it

Are you looking to backup your Blogger Template? Without having a backup of your blogger template, you can simply run into a lot of problems. You might end up in breaking your blogger template completely. Therefore, It is the rule of thumb to take backup of your blogger template before making any edits to the codes of your template. In this article, we will show you how to backup your Blogger Template.
Read more �

Backup All Your Amazon Instance Files to S3 Bucket

In our previous posts, Amazon EC2 Cloud Installation and Amazon EC2 Setup with Ubuntu and XAMPP Installation discuss how to launch virtual servers as you need, configure security and networking and manage storage. This allows you to eliminate your investment in hardware, so you can develop and deploy applications faster. AWS is used by most of the smart people in this present technical world. But any old or new application maintained in a server needs a backup, so that any unfortunate crash in the system should not lead you to be in a state of pressure of what to do next. Today’s post help you to maintain the backup of your files as per the daily basis.

Backup your Amazon Instance Files to S3 Bucket

Read more »

Why Blogspot Gives Two Description Fields To Edit?

two description fields in blogspot blogs


Blogger dashboard settings allow users to change the description of the blog twice once under the "Basic" option and next under "Search Preferences > Meta Tags" option. Blogspot users often find it confusing to understand the purpose behind each of these description boxes. We will discuss in detail the basic difference between each of these description boxes.

Purpose of Blog Description Field Under "Basic" Option

You can edit this description of the blog by going to Blogger > Settings > Basic : Basic.

blogspot description box

Description under Basic option is your front-end description of the blog that is shown as text under your Blog Title inside the Header section. You can call it as your blog punch line, blog slogan or a brief blog description. It must be short and precise, not longer than 3-4 words which could be your targeted keywords also. .

Note: It is not your meta description that is displayed in search results. It is your front-end textual blog description that is shown to your blog visitors. You can choose to display this description or hide it. It has no SEO value compared to meta description that we will discuss later in this post.

In our case it is "Transforming Bloggers Into Entrepreneurs"

blogspot description below blog title

Purpose of Description Field Under "Meta Tags" Option

You can edit this description of the blog by going to Blogger > Search preferences > Meta tags: Description.

blogspot meta description box

This your blog's Meta Description that gives search robots a brief introduction of your blog in no more than 150 characters. This is not shown to your blog visitors but is added inside the template source file. Visit your blog and click "Ctrl + U" to view source. Search for "Description" and you will see the meta description HTML tag as shown below:

blogspot meta description box

I have created several tools for creating SEO friendly meta description tags which you can try below:

By default blogger shows your blog meta description inside all your blog posts, static pages and archive/search pages. As a result of this two meta description tags are created on your source page. Once for the blog homepage and once for the post description (description you type in blogger editor: search option). To counter this problem read the following post where I have suggested a perfect solution:

If you can't see a meta description option for your blog posts in the editor then please read this post:

I hope this post may have cleared your confusion on what exactly is the difference between each of these description fields. Let me know if you have any questions. Peace buddies =)

PixelPhone Enhance your Experience Getting Over the Default UI of your Android Smartphone

PixelPhone is an app for your Android device that replaces your default phone app to offer you a better experience. It has features that you don't usually get through your pre-installed phone & contact apps. Since its initiation some years back, the app has constantly refined and improved its features to better suit user's needs. Once you start using the app, you would not want to go back to the previous default version of your phone.

PixelPhone Enhance your Experience Getting

Read more »

Ad Blocker Detector for Google Adsense with JavaScript

Advertisements are very important for any post published in internet. This is what decides the person’s revenue. But, recently adblocker system is killing revenue of the publisher because of which it also effects the creativity of that person. Today, I am providing a simple new solution for those depressed and effected persons of adblocking system. Here is a simple javascript to be included along with your website code to either hide the content of your website or show a pop-up or alert message to remove the viewers adblock plugin. Any blogger or any website management can use this code to improve your revenue of your website. This code is mainly designed for Google Adsense.

Ad Blocker Detector for Blogger with JavaScript

Read more »

How to Add Jumbo Social Share Bar with Counters in Blogger

How to Add Jumbo Social Share Bar with Counters in Blogger
Are you looking to add a Jumbo social share bar in Blogger? Why it is called a Jumbo Social Bar? What's the catch? You might have seen those nice looking social sharing buttons that show the total number of social shares counts that your particular post or page has received. Today in this article, we will show you how to add jumbo social sharing bar with counters in blogger.
Read more �

How To Make Money with Pokemon GO

Pok�mon!

Pokemon GO is a new and different game with latest hacks of playing every day, people are finding new-new ways to play Pokemon GO as its a interesting and addictive game of this year.

With this craze you can see there are many new players coming and they want to beat other records in the game, but they can't.

To do so they've to play game and win its tasks and also they've to go to pokestops a real world in game to get free in-game items.
How To Make Money with Pokemon GO
However!

Pok�mon creators are generating tons of many every single day now, because many players pay them to lead from others and they make money easily.

What if you can start earning money just by playing Pok�mon Go?

I know its pretty impressive to you, but trust me!! many folks or you can say Pok�moners or making money playing their favorite game.
Read more �

How to Add a Multi-Author Info Box in Blogger Posts

How to Add a Multi-Author Info Box in Blogger Posts
Do you want to add a Multi-Author Info box in Blogger posts? The author bio box allows you to display relevant information about the post author. Author boxes are great for connecting with your readers and providing a sense of credibility to your site. Today, in this tutorial we will show you how to add a multi-author info box in blogger posts.
Read more �

Most Dynamic Random Posts Widget For Blogger

Random Posts Widget For Blogger
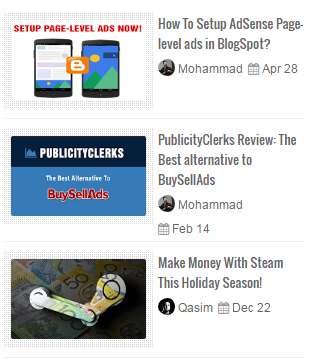
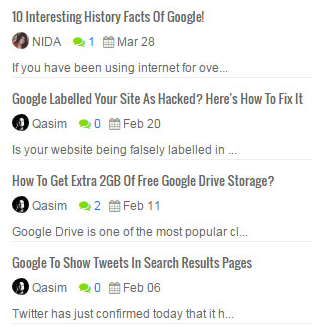
Blogger random posts widget shows a random list of your blog posts with thumbnails, title, comments count, date, label tag and author avatar. It is really important to send traffic to your old posts and keep highlighting them. Random Posts gadget helps your readers to take a quick look at some of the older posts that they might have missed reading. It attracts readers attention towards oldest posts thus helping you with increased pageviews and higher revenue. This widget displays both label links and author avatar which are the two features first time introduced for blogspot blogs and thus makes this widget extremely unique. It is built using Blogger JSON Feeds technique that we have discussed in detail.

DEMO: Look at the right sidebar of MBT blog

Tabbed Random Posts Widget

Random Posts Widget Features

Random Posts widget has some unique features introduced first time online :

  1. Author Avatar - Unique!
  2. Clickable Comments Count
  3. Shows Post Labels - Unique!
  4. Custom Date Format
  5. Clickable Animated Featured Thumbnails - Unique!
  6. Option to increase or decrease thumbnail Resolution - Unique!
  7. Support for Third-party Images and YouTube thumbnails - Unique!
  8. Title Length is adjustable

Add Random Posts Widget To Blogger

Follow the steps below to install random posts widget on a blogspot blog:

  1. Go To Blogger > Template
  2. Backup your template
  3. Click "Edit HTML"
  4. Just below <head> tag paste the following CSS source links:

    <link href='http://fortawesome.github.io/Font-Awesome/assets/font-awesome/css/font-awesome.css' rel='stylesheet'/>
    <link href='http://fonts.googleapis.com/css?family=Oswald' rel='stylesheet' type='text/css'/>

  5. Next search ]]></b:skin> and just above it paste the following code:

    /*######## Random Posts Widget By STCnetwork.org ########*/
    .mbtlist {list-style-type:none;overflow:hidden; margin: 10px 0px 0px 10px!important; width:300px; padding:0px!important;}
    .mbtlist li {margin:0px auto 10px auto; clear:both; color:#666; font-family:helvetica; font-size:12px; border-bottom:1px solid #eee; overflow:hidden; position:relative}
    .mbtlist li a { color:#666; text-decoration:none; }
    .mbtlist i{color:#999; padding-right:5px; }
    .mbtlist .iline{line-height:2em; margin-top:3px;}
    .mbtlist .icontent{line-height:1.5em; margin-top:5px; clear:both}
    .mbtlist div span{margin:0 7px 0 0; display:inline-block;font-weight: normal; }
    .mbtlist .mbttitle {font-family:oswald; font-size:13px; color:#838383; font-weight:normal; text-decoration:none;}
    .mbtlist .mbttitle:hover, .mbtlist .itotal a:hover  {color:#333; text-decoration:none;}
    .mbtlist .iedit a{text-decoration:none; color:#999; cursor:pointer}
    .mbtlist .iedit:before, .mbtlist .iauthor:before, .mbtlist .itag:before, .mbtlist .icomments:before, .mbtlist .idate:before, .mbtlist .itotal span:before{font-family:fontAwesome; position:relative; padding-right:8px; color:#999;}
    .mbtlist .iauthorpic{width: 17px;height: 17px;border-radius: 50%;
    float: none; display: inline-block; margin:0px 0px 0px 0px; padding-right:3px; position:relative; top:3px;}
    .mbtlist .itag{    color: #fff;position: absolute;left: 9px;top: 9px;display: inline-block;font-size: 11px;width: 100px; height:22px;    overflow: hidden;}
    .mbtlist .itag a{background:#000;background:rgba(0,0,0,0.7);text-decoration:none;color:#fff;padding:4px 5px;text-transform:capitalize;line-height: 2em;font-family: arial;font-size: 11px;border:1px solid #333;}
    .mbtlist .itag a:hover{background:#84DB06;border: 1px solid #84DB06; color:#fff; text-decoration:none;}
    .mbtlist .iFeatured{overflow:hidden;position:relative;float:left;margin:0 10px 10px 0;padding:0;}
    .mbtlist .iFeatured a {background: url(https://blogger.googleusercontent.com/img/b/R29vZ2xl/AVvXsEifiu_PsNWHatQNu9R4ZSEL_9uWgsToBb-sf4WAWjcwTZLNHQk5ZcJW25f5hZO1gUVPaHNEop5dCTdR3jLJtSdPRagVX5ArqqiB22HoCEh-W0mAvDtqBU2FUUQ_QTWLifp5B7bmW3ZK93w/s100/mbt-bg1.png) 0 0;padding:6px 5px 4px 6px;display: block;}
    .mbtlist .iFeatured img{width:100px;height:60px;-moz-transition:all .3s;-webkit-transition:all .3s;transition:all .3s;    border: 1px solid #ddd;       border-radius: 2px;}
    .mbtlist .iFeatured:hover img{ opacity:1; -moz-transform:scale(1.4);-webkit-transform:scale(1.4);transform:scale(1.4)}
    .mbtlist .icomments a{color:#0080ff; font-family: arial;font-size:12px;}
    .mbtlist .icomments a:hover{text-decoration:underline}
    .mbtlist .icomments:before {content:'\f086'; padding:0px 3px 0px 7px; color:#84DB06;}
    .mbtlist .idate:before {content:'\f073';padding-right:4px}
    .mbtlist .iedit:before {content:'\f040';}
    .mbtlist .imore {font-size:16px; font-weight:bold; text-decoration:none; color:#666;}
    .mbtlist .itotal {color:#999;  padding:5px 0px; }
    .mbtlist .itotal a {font-family:"Droid Sans"; font-size:12px; font-weight:normal; color:#999; text-decoration:none}
    .mbtlist .itotal span:before {content:'\f07c';}
    .mbtlist .itotal span font {padding:0px 3px; color:#333; font-family:droid sans; font-size:15px; font-weight:bold}

  6. Save your template.
  7. Now go to Blogger > Layout
  8. Select "Add a Gadget"
  9. Choose "HTML/JavaScript" gadget
  10. Paste the following code inside it:

    <script type='text/javaScript'>
    //#################### Defaults
    var ListBlogLink = "http://mybloggertricks.com";
    var ListCount = 3;
    var ChrCount = 85;
    var TitleCount = 70;
    var ImageSize = 150;
    var showcomments = "on";
    var showdate = "off";
    var showauthor = "on";
    var showthumbnail = "on";
    var showlabel = "on";
    var showcontent = "off";

    var RandomArray = [];
    var TotalPosts  = 0;
    var RandomArray = new Array(ListCount);

    function TotalCount(json) {
        TotalPosts   = json.feed.openSearch$totalResults.$t
    }
    document.write('<script type=\"text/javascript\" src=\"http://www.mybloggertricks.com/feeds/posts/default?alt=json-in-script&callback=TotalCount\"><\/script>');

    function GenerateNum() {
        for (var i = 0; i < ListCount ; i++) {
        for (var j = 0; j < RandomArray.length; j++){
        var RandomNum = Math.floor(Math.random() * (TotalPosts ) + 1);
        RandomArray[i] = RandomNum; }
                                                                      }
    }
    </script>
    <script type='text/javaScript'>

    document.write('<ul class="mbtlist">');
    //################ Function Start
    function mbtrandom(json) {
    for (var i = 0; i < ListCount; i++)
    {
      
    //################### Variables Declared
    var listing= ListImage = ListUrl = ListTitle = ListImage = ListContent = ListConten = ListAuthor = ListTag = ListDate = ListUpdate = ListComments = thumbUrl = TotalPosts = sk = AuthorPic= ListMonth = Y = D = M = m = YY = DD = MM = mm = TT =  "";

    //################### Category
    if (json.feed.entry[i].category != null)
    {
    for (var k = 0; k < json.feed.entry[i].category.length; k++) {
    ListTag += "<a href='"+ListBlogLink+"/search/label/"+json.feed.entry[i].category[k].term+"'>"+json.feed.entry[i].category[k].term+"</a>";
    if(k < json.feed.entry[i].category.length-1)
    { ListTag += " ";}
    }
    }

    //################### URL
    for (var j = 0; j < json.feed.entry[i].link.length; j++) {
          if (json.feed.entry[i].link[j].rel == 'alternate') {
            break;
          }
        }
    ListUrl= "'" + json.feed.entry[i].link[j].href + "'";

    //################### Info
    TotalPosts = json.feed.openSearch$totalResults.$t;
    if (json.feed.entry[i].title!= null)
    {
    ListTitle= json.feed.entry[i].title.$t.substr(0, TitleCount);
    }
    if (json.feed.entry[i].thr$total)
    {
    ListComments= "<a href='"+json.feed.entry[i].link[j].href+"#comment-form'>"+json.feed.entry[i].thr$total.$t+"</a>";
    }
    ListAuthor= json.feed.entry[i].author[0].name.$t.split(" ");
    ListAuthor=ListAuthor.slice(0, 1).join(" ");

    AuthorPic = json.feed.entry[i].author[0].gd$image.src;
    //################### Content Check

    ListConten = json.feed.entry[i].content.$t;
    ListContent= ListConten.replace(/(<([^>]+)>)/ig,"").substring(0, ChrCount);

    //################### Date Format

    ListMonth= ["Jan", "Feb", "Mar", "Apr", "May", "Jun", "Jul", "Aug", "Sep", "Oct", "Nov", "Dec"];

    ListDate= json.feed.entry[i].published.$t.substring(0,10);

                             Y = ListDate.substring(0, 4);
                            m = ListDate.substring(5, 7);
                             D = ListDate.substring(8, 10);
                             M = ListMonth[parseInt(m - 1)];                       

    ListUpdate= json.feed.entry[i].updated.$t.substring(0, 16);

                             YY = ListUpdate.substring(0, 4);
                            mm = ListUpdate.substring(5, 7);
                             DD = ListUpdate.substring(8, 10);
                             TT = ListUpdate.substring(11, 16);
                             MM = ListMonth[parseInt(mm - 1)];   

    //################### Thumbnail Check
    // YouTube scan

    if (json.feed.entry[i].content.$t.match(/youtube\.com.*(\?v=|\/embed\/)(.{11})/) != null)
    {

        var youtube_id = json.feed.entry[i].content.$t.match(/youtube\.com.*(\?v=|\/embed\/)(.{11})/).pop();
       
        if (youtube_id.length == 11) {
            var ListImage = "'//img.youtube.com/vi/"+youtube_id+"/0.jpg'";
            }
    }

    else if (json.feed.entry[i].media$thumbnail)
    {
    thumbUrl = json.feed.entry[i].media$thumbnail.url;
    sk= thumbUrl.replace("/s72-c/","/s"+ImageSize+"/");
    ListImage= "'" + sk.replace("?imgmax=800","") + "'";
    }

    else if (json.feed.entry[i].content.$t.match(/src=(.+?[\.jpg|\.gif|\.png]")/) != null)
    {
    // Support For 3rd Party Images
    ListImage =  json.feed.entry[i].content.$t.match(/src=(.+?[\.jpg|\.gif|\.png]")/)[1];
    }
    else
    {
    ListImage= "'https://blogger.googleusercontent.com/img/b/R29vZ2xl/AVvXsEgAGUfSnOl8Z80gfkB3nf4E6leIH9b9OTX5_A6kGYdeyDWGdLwiDFiBviv0bDAWrrvjSJCz_-CkNJYcTYjw1u7RpJBfat_lFl0hPlE_kv7AADKMtFU4PPpY8DM21SEgNMaR2xUN21hR6D0/s200/Icon.png'";
    }
    //################### Printing List

    document.write( "<li style='margin:0px auto 10px auto!important; padding:0px!important;' class='node"+[i]+"' >");
    if (showthumbnail == 'on'){
    document.write("<div class='iFeatured'><a  href="
    + ListUrl+
      "><img src="
    +ListImage+
    "/></a></div>");
    }

    if (showlabel == 'on'){
    document.write("<span class='itag'>"
    +ListTag +
    "</span>");
    }

    document.write("<a class='mbttitle' href="
    + ListUrl+
    ">"
    + ListTitle+
    "</a><div class='iline'>");

    if (showauthor == 'on'){
    document.write("<span class='iauthor'><img class='iauthorpic' src='"+AuthorPic+"'/>"
    +ListAuthor+
    "</span>");
    }
    if (showcomments == 'on'){
    document.write("<span class='icomments'>"
    +ListComments +
    "</span> ");
    }

    if (showdate == 'on'){
    document.write("<span class='idate'>"
    + M +
    " "
    + D +
    "</span>");
    }


    document.write("</div>");

    if (showcontent == 'on'){
    document.write("<div class='icontent'>"
    +ListContent +
    "...</div> ");
    }
    document.write("</li>");

    }
    document.write("<div class='itotal'><span> <a href='"+ListBlogLink+"'>View all <font>"+TotalPosts+"</font> posts in  -  "+ListLabel+" </a></span></div>");
    }

    <!-- ######### Invoking the Callback Function ######## -->
    for (var i = 0; i < ListCount ; i++) {
    GenerateNum();

        document.write('<script type=\"text/javascript\" src=\"http://www.mybloggertricks.com/feeds/posts/default?alt=json-in-script&start-index=' + RandomArray[i] + '&max-results=1&callback=mbtrandom\"><\/script>')
    };
    document.write('</ul>');
    </script>

  11. You can easily choose to show or hide an option using on/off Boolean values. Simple make these settings:
    • Replace http://mybloggertricks.com with your Blog URL. It appears thrice.
    • Mention number of posts to display in ListCount = 3;
    • Edit ChrCount = 90; to choose how many characters you wish to display in post description.
    • Edit TitleCount = 70; to choose post title length.
    • You can control the resolution or aspect ratio of thumbnails by editing ImageSize = 150; where the value 150 means that you want your images to be within 150 x 150 pixels in size. Make sure to keep this value close to the image size to ensure website load time is not effected a lot. Since our thumbnail images have a width of about 100px, therefore I have kept the resolution as 150, slightly higher to display images in slightly good resolution.
    • To show an element simply choose on and to hide it choose off. You apply these switch on/off values to these 6 variables: showcomments, showdate, showauthor, showthumbnail, showlabel, showcontent
  12. Click Save and you are all done!

Visit your blog to see a random post widget exactly like the one below:

Random Posts Widget For Blogger

Customize Random Posts Widget

By simply changing on/off values you can change the entire layout of the random posts gadget. Let me show you some examples:

1 Switching off showcontent and showdate will produce this look:

Random Posts Widget For Blogspot

2 Switching off showcontent, showlabel and showcomments will produce this look:

Random Posts Gadget For Blogspot

3 Switching off showcontent, showthumbnail, showcomments and showlabel will produce this look:

Blogger Random Posts Widget

4 Switching off showthumbnail and showlabel will produce this look:

Simple List of Random Posts in Blogger

5 Switching everything on will produce this layout:

Random Posts Widget with Content

6 Each "li" tag has its own class (such as .node0, .node1, .node2, etc.) that you can use to customize the look and appearance of each list. By changing these styles you can display recent posts in several interesting layouts such as:

Vertical List of Random Posts With Large Thumbnail at Top:

Vertical List of Random Posts Gadget With Animated Thumbnails

Horizontal List of Random Posts With Large Side Thumbnail:

Horizontal List of Random Posts Widget With Thumbnails

This is the exact same technique that I used to design COPmo template.

Coming Next: Random Posts Slider!

I hope you may find the above widget useful and unique. In our coming tutorials our focus will be to display random posts inside a vertical or horizontal flexslider. Let me know if you need any help or assistance. Peace buddies =)

How Do I Find Readers and Get Traffic for My Blog?

Hey! Dear ABT readers.

I am back with an question asked many times to many pro bloggers and Websters by newbies at blogging.

Also I got this question in my Facebook inbox and Twitter too. So! today I decided to give the answer in public.
How Do I Find Readers and Get Traffic for My Blog?
Here's the things and tips to follow for gaining traffic and readers to your blog. Read carefully and follow my ways effectively. This is not just a copy paste article. It is my hard-work and your luck.
Read more �

Guest Posting Now On BloggingeHow - Opportunity To Get Noticed

guest posting on bloggingehow

After quite many years, finally it's time.

Guest posting has always been one of the top ways to build authority backlinks ever since search engine optimization start! People tried finding new ways that were acceptable to search engines as well as to humans too.

Looking forward to that, many of brothers and sisters emailed me to enquire if BloggingeHow was open for guest posting.


Earlier, since quite some years, I realized that I didn't wanted to accept guest posts due to the following factors:

1. Majority guest posts are low in quality
2. Most of them are just targeted to suck backlinks juice and provide very little value.
3. Poor English and language skills.

Though I think, after quite many years, it's time that we open it up for everyone. Though, I've mentioned quite some filters which would be considered when a guest post would be accepted on BloggingeHow.

Hope that helps all InshaAllah

Top 5 Discussion Forums for Bloggers For Self Promotion

 top discussion forums for bloggers

Forums could help you learn years of information with in days!

Many of us are well aware of the points that are considered in building up your blog. A successful blogger should be social and active at forums. This goes for the ones whose blogs are still young. Forums provide us with many advantages. We can build high quality back links, gain traffic and many more friends.

So looking forward to this I compiled a list of best forums out there, for bloggers so that they gain gain exposure while hanging out with experienced bloggers and promote their blogs. 

And at the same time, learn about various aspects of blogging which otherwise would take quite some time for them to get grasp of.

Lets get started with our list of best blogging forums :)

AskHassam Forum | Newly Launched - Bonus

We recently launched an AskHassam forum which is in fact a better version of the already existing Facebook group that we have. The forum runs on the most popular forums technologies called Discourse and is ready to take over all the Blogging forums out there.

Why? The love and aspect of family is the key here. Everyone runs after helping each other and to make sure that they are served in the best way possible. :)


I haven't seen that any where around other online communities.

AskHassam best blogging forum

Digital Point

It is one of the best forums out there. This forums is ranked pretty high and has a lot traffic. There are many active users all the time who are ready to make new friends. Unlike other dead forums, you would get a reply most of the time here. Its a worth joining forums.

Just don't forget to set your signature. The signature with your blog's link would give you back-links each time you write a new reply.


digital point forum


ShoutMeLoud Forum

ShoutMeLoud was founded by an amazing Blogger who has been an inspiration for millions started his blog's forum. The forum has currently over 4.1k members with over 700 active and has been helping everyone around.

ShoutmeLoud forum

Bloggeries


Bloggeries have many great topics to discuss and learn. It is also one of the best forums for your blog promotion at present. There is also a section where you can submit your blog links and get targeted traffic. A must join forum.


Site Point


Site point has a great Alexa rank and have tons of traffic. You active participation in this forum can make a difference in your blogging career. The more you would write in this forum with your signatures posted as your blog links, you would strengthen your blogs backbone.


Conclusion


The purpose of this list isnt that you should join all of the above forums. I would recommend to join any one of them that you like the most and then  stick to it. There is no use of making gathering at different spots. Those are of no use. Try to expose your blog in one, or maximum two of the forums you like.

I personally joined many of them but now i try to be active at few. Forums can really help in  building  back links but still keep in mind that the real strengthen of your blog is your quality content. If you don't have content then there is no need to join these forums literally.

Leave you favorite forums among these in comment section and tell which you look forward to join in future.

Peace and blessings