Showing posts with label Plugins. Show all posts

Add Music To Blogger Blog (blogspot)

Add Music To Blogger Blog (blogspot)

NOTE: This tutorial is pretty old and I have posted a new and much elegant way to music to blogger blogs below.


  • [message]
    • ##check## Kindly Note
      • I published this music player in 2011. Now there are many new much more attractive audio players for Blogger that I have shared below. You can check them out too :)

New Blogger Music Player #1 It's has option to add playlists, upload your own music files, and much more advanced player controls. And on top of all, a simple code to install in blogger. How To Add Elegant Music Player To Blogger In 3 Minutes [VIDEO]

 New Blogger Music Player #2 This is the SCM music player for Blogger that rocks!

Another Blogger Music Player Video Tutorial


Below Is The Original Simple One I Shared Long Back


Adding music to blogger blog is pretty easy and requires few steps to be followed. First decide where on your blog you want to the music to be. Music can be initiated in number of ways. By a link, when you blog loads, or when reader turns it on himself using a music player on your blog.

To set up any of these ways follow the steps below :

Before that, you may like to read:

By a Link

[<a href="URL of music file">Click to hear music file</a>]
To test the code you can use this link:

[https://sites.google.com/site/forfavicon1991/Halo_Theme.mp3?attredirects=0&d=1]

You can put this code any where you want e.g on the side bars, in the post.
To add the link in the side bar go to Blogger dashboard> Design > Add a widget > HTML / JavaScript
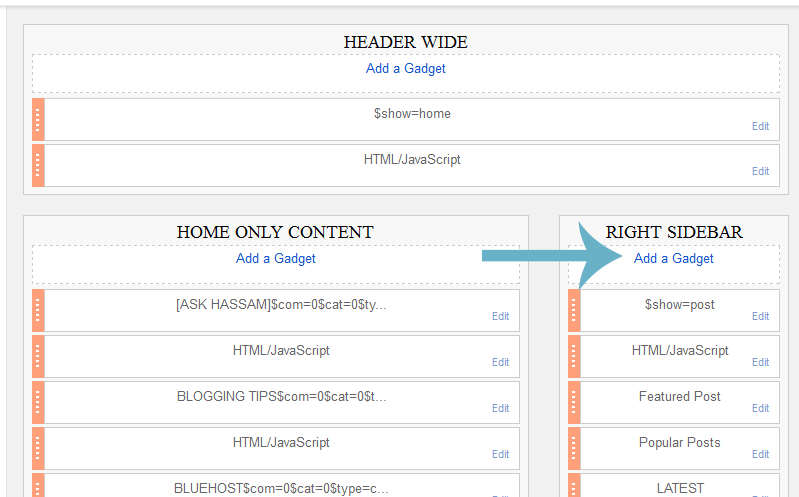
blogger layout add gadget

html javascript widget blogger


By a Music Player:

To add a music playing options, add the following link to your blog. Same as before, you can add this code to the blogger post or sidebar of the blog.

The player will look like this:
[<embed autostart="false" height="40" loop="true" playcount="2" src="URL of music file" width="300"/></embed>]

 Follow the same steps before in the ( Click the link ) section to add the music to sidebar. By changing the  commands like autostart , height , playcount , width you can change the characteristics of the player. 
 

Autostart: 

Change this to either " true " if you want the music to start automatically when the page loads or type " false " so that the reader will click the play button to play the music.

Height:


To change the height of the player

Play count:
The number of times the song will be played before it stops

Loop:

To repeat the same song over and over again

To know more about the Blogger and Rising Social Media, Like Facebook Page and Follow us on Twitter.

You can now read out:

How to Add Page Peel Off Effect to Blogger Blog

page peel off effect

 To add the page peal of effect, that is when you hover over the peal of area you will watch a cool page peal off like effect. This effect is done using jQuery language is pretty amazing. So lets get started. Try out the demo link below where you will see this widget on top right corner.


Step 1:


Go to Design >> Edit  HTML and Search for the following tag:

[</head>]
 And just above the tag mentioned, past the following code.


[<style type='text/css'>
img { behavior: url(iepngfix.htc) }
#pageflip {
position: relative;
right: 0; top: 0;
float: right;
}
#pageflip img {
width: 50px; height: 52px;
z-index: 99;
position: absolute;
right: 0; top: 0;
-ms-interpolation-mode: bicubic;
}
#pageflip .msg_block {
width: 50px; height: 50px;
overflow: hidden;
position: absolute;
right: 0; top: 0;
background: url(https://blogger.googleusercontent.com/img/b/R29vZ2xl/AVvXsEh8YvywjY-f6w9eMd02nqllae5Q7p5ifF-N9He7SnO040BCCy73npdqUrNRpLJHj_w1FrpHthnAhleYfCSSgrL6w-htue1N33hCMqDqZ3KOsd6EQRAKD55WsJiovkixfP3yusJagcmwhfE/) no-repeat right top;
}
</style>

<script src='http://code.jquery.com/jquery-latest.js' type='text/javascript'/>
<script type='text/javascript'>
$(document).ready(function(){

//Page Flip on hover

$(&quot;#pageflip&quot;).hover(function() {
$(&quot;#pageflip img , .msg_block&quot;).stop()
.animate({
width: &#39;307px&#39;,
height: &#39;319px&#39;
}, 500);
} , function() {
$(&quot;#pageflip img&quot;).stop()
.animate({
width: &#39;50px&#39;,
height: &#39;52px&#39;
}, 220);
$(&quot;.msg_block&quot;).stop()
.animate({
width: &#39;50px&#39;,
height: &#39;50px&#39;
}, 200);
});
});
</script>]


Step 2:


Now just below the </head> tag past the following code:

[<div id='pageflip'>
<a href='http://feeds2.feedburner.com/bloggeratnext'><img alt='' src='https://blogger.googleusercontent.com/img/b/R29vZ2xl/AVvXsEjw72oLlHu2bwFvsgThxQ3MsthtjsZaFwyYf8nA3AyIQQ07mTMgjFGCEbrg1IQDVXh2Xme-ZuFt-Y7EJ8hk6zDP9H4O8DXthns9TfhXNZTNPDHiDHFePiFaAaZBfvhDnx8ZmTjB3vDHGlg/'/></a>
<div class='msg_block'></div>
</div>]


Customize:


How to Add Page Peel Off Effect to Blogger Blog
Now change the link highlighted in red in (Step 2) with your own feed link. Note its not necessary that you add your feed link, instead you can add any link you want.

Also you  can add your own subscribe button image that you see when you hover over it. This can be done by making another image of dimensions (307 x 308), and then make it diagonally half while making the other part transparent.

Notice in this subscribe image below, the half diagonal part is transparent. Likewise you can just make a triangular image too. Once the image is ready, upload it somewhere online (On your Picasa Webalbum if you want) and replace the red link in (Step 1) this time with your image link.

Feedburner Email Subscription Widget With 12 Social Buttons


Feedburner is the most popular feed syndication service out there, and probably that's the very reason why you're here too. There are tons of Feedburner email subscription widgets out there, though not many are able to portray that premium WordPress touch.

Today, the widget that you see is a beauty in it's own kind and is a one stop shop widget that you need to place in your sidebar.

I would prefer such subscription widgets at the top most placement on the sidebar (may it be left/right sidebar). The more eyeballs will catch the widget's colors, the higher your optins would be.


http://demo.bloggingehow.com/live-demo/Feedburner%20Email%20Subscription%20Widget%20With%2012%20Social%20Buttons.html


So lets get started and go through simple steps that will help you setup this Feedburner email subscription widget with 12 social buttons including (Facebook, Twitter, RSS, YouTube,Vimeo, LinkedIn, Tumblr, Google+, Pinterest, Instagram and more).

Before we move any further, check out one of the best Lightbox popup email subscription widget we published recently:

Widget Installation


For Blogger (Blogspot) users, navigate to Dashboard >> Layout >> Add a New Gadget >> HTML/JavaScript and place the following code with in it. Hit save when done.

Share To Unlock Widget Code


[lock]
[<div class="outer-most">
<table>
<tr>
<td>
<div id="social-widget-2" class="widget widget_socials white_box">

<div class="social_wrapper">

<div class="social_inner">
<a class="facebook" title="Facebook" href="FACEBOOK LINK"></a>
<a class="twitter" title="Twitter" href="TWITTER LINK"></a>
<a class="rss" title="RSS Feed" href="RSS LINK"></a>
<a class="flickr" title="Flickr" href="FLICKER LINK"></a>
<a class="youtube" title="Youtube" href="YOUTUBE LINK"></a>
<a class="vimeo" title="Vimeo" href="VIMEO LINK"></a>
<a class="linkedin" title="Linkedin" href="LINKEDIN LINK"></a>
<a class="tumblr" title="Tumblr" href="TUMBLR LINK"></a>
<a class="dribbble tooltip" title="Dribbble" href="DRIBBLE LINK"></a>
<a class="google_plus" title="Google_plus" href="GOOGLE+ LINK"></a>
<a class="pinterest" title="Pinterest" href="PINTEREST LINK"></a>
<a class="instagram" title="Instagram" href="INSTAGRAM LINK"></a>
<div class="clear"></div>
</div>
</div>
<div class="clear"></div>
</div>

<div class="widget widget_newsletter white_box blue">
<div class="border_b">
<div class="newsletter_inner">
<h3>Newsletter</h3>
<p>Sign up to receive email updates and to hear what's going on with our company!</p>
<form target="popupwindow" onsubmit="window.open('http://feedburner.google.com/fb/a/mailverify?uri=YOUR FEEDBURNER ID', 'popupwindow', 'scrollbars=yes,width=550,height=520');return true" method="post" action="http://feedburner.google.com/fb/a/mailverify">
<input class="letter_email" type="text" placeholder="Email address" name="email">
<input class="letter_submit" type="submit" value="Ok" name="submit">
<input type="hidden" value="YOUR FEEDBURNER ID" name="uri">
<input type="hidden" value="en_US" name="loc">
</form>
</div>


</div>

</div>


<style>

.widget_socials .social_wrapper {
    padding: 0px 20px 10px;
}
.widget_socials .social_inner {
    margin-right: -20px;
}
.widget_socials a {
    background-color: #888888;
    background-position: 50% 50%;
    background-repeat: no-repeat;
    border-radius: 2px 2px 2px 2px;
    box-shadow: 0 1px 1px rgba(0, 0, 0, 0.3);
    float: left;
    height: 35px;
    margin-bottom: 10px;
    margin-right: 10px;
    overflow: hidden;
    text-indent: 9999em;
    width: 35px;
}
.widget_socials a:hover {
    background-color: #666666 !important;
}


.widget_socials a.facebook {
    background-color: #6F85AE;
    background-image: url("https://blogger.googleusercontent.com/img/b/R29vZ2xl/AVvXsEjBWe7SMTRJ9nCAYJ6HjiA_oOvhRJ4udz6Px1r_ulhnP-vk2KxFZNC2Lk2LG-Gq3v7Ezx2us3SxuVub0WthdYPO5-zXMHENF2diC98LBiw3Ew3w1-ga6NqgF5eWOX-0V8XM3OXLIj949OU/s24/fb.png");
}
.widget_socials a.twitter {
    background-color: #23B6C6;
    background-image: url("https://blogger.googleusercontent.com/img/b/R29vZ2xl/AVvXsEhOjX9qF0qfMUi-UStt_J_op-JSCJ-hY4G20X62xLzY97HOerMU3IikuedlXcPBiNij_DBIOo9HrXGJZgwkj_dq5VnKMySu_Fs1xo7UZxVk-Ky56jfn2VSTryqSu4xBd2aZ8pRPku4_pbA/s24/twitter1.png");
}
.widget_socials a.flickr {
    background-color: #FF0084;
    background-image: url("https://blogger.googleusercontent.com/img/b/R29vZ2xl/AVvXsEhS8dpSYIgTKBQX8xsdRgF4LcEMWOHvN_VwDT-nDaxo4owaK5rO2EKE5_tIJfKRsU3sDzdbSx_Q7_CIrox8bXCtxen7IRaOEUcEcpOKyorf2LyRlDdnWvDqENxm39H7CLhYnlu4-3n5GHY/s24/flicker.png");
}
.widget_socials a.dribbble {
    background-color: #C6376D;
    background-image: url("https://blogger.googleusercontent.com/img/b/R29vZ2xl/AVvXsEiUAV-y-OidPwKxQ-JPYEbRLsJul8E52AJJR3hyphenhyphenfc72DDP0AcOG0FxlxHwASvAVxKfON0gqyH95vxsm79zf8B697Od9oxhmj43y30nY1G_r_v8noITfI_txHApAlTzJ9F-3r1OaISxl86s/s24/dribble.png");
}
.widget_socials a.vimeo {
    background-color: #20B9EB;
    background-image: url("https://blogger.googleusercontent.com/img/b/R29vZ2xl/AVvXsEjeLwfFdzP0MX-QvQwyudZ23NN9v05hN6Xe7VJOI6wcHhm_KJZZIjG7HIWGVy5_gx-ZMHLN8tZ4ZpB7wZTop1tcK838hwZZDWKass6zaN-zgQeIClFlpSN3wmbkEIsRJYe1ZBDRoALj-Aw/s24/vimeo.png");
}
.widget_socials a.tumblr {
    background-color: #2E4B68;
    background-image: url("https://blogger.googleusercontent.com/img/b/R29vZ2xl/AVvXsEgC7CjX2XSheu_UGx9X7s8H2YzM2XiADK-qrhfyJwwZRENECMY23Qrm4cCX-GrrohbmCd5Ov49ycuur2eVKV5TKZHxhnv2NftPfPqIa8072etVdcaz2zMs0Rnt9Ct6OyJrlBmEe18Wvodk/s24/twitter.png");
}
.widget_socials a.rss {
    background-color: #FA7204;
    background-image: url("https://blogger.googleusercontent.com/img/b/R29vZ2xl/AVvXsEicvFfq231dpbfg8cWT_4ZJGkfUzSweSgncujBZy8XSqqazf3V5ggY8mwe1VtzHYGu4UJX28AB78TjK5fDCxE5xUXy1E_XCdeTMs44KqYSE7Gb74lj9p_B-okfBcuImU2uQ2f-3vWHBSQk/s24/rss.png");
}
.widget_socials a.linkedin {
    background-color: #006699;
    background-image: url("https://blogger.googleusercontent.com/img/b/R29vZ2xl/AVvXsEju0_gA8UbeaTJPeboyG8MIFRovQt8tygTGvZ6pIlVCUPq_qx5n01kSasIiaUbEjHQ4pcgJFRlZpopjR879XPljoCLlEsUGyCumdVm1ntV_d2lCj7QSNIHn95-chEYz04Zld6Lb2IMpzg8/s24/linkedin.png");
}
.widget_socials a.youtube {
    background-color: #DD3D3D;
    background-image: url("https://blogger.googleusercontent.com/img/b/R29vZ2xl/AVvXsEjF_kRMD9oLDwooUjofEsd6Fpfm96j8v6rW_DR-V_KGoSwha2bcJCqNRQPt1IOEffrFbcvEBfWJ-81t0VaqBUfr0EDOO1hduF2YB7010wuK-hWspw8Qy4WBMKRAmYPeBPikcJ_IyMm7JXA/s24/youtube.png");
}
.widget_socials a.google_plus {
    background-color: #DD3D3D;
    background-image: url("https://blogger.googleusercontent.com/img/b/R29vZ2xl/AVvXsEhPOYZQA2iJgB1W_e0EibcJYSDApZnmpM3rg11gzwtW6hiu-Jb5pVpsUXCBzw-89-feJvGDoo_xJK3a_0HG3Af1Sn4llPMtEpfUaDSho3PbZpoEtaxtjiNdrtOjx_88l0e_Q3a_Yug7Lt4/s24/google+.png");
}
.widget_socials a.pinterest {
    background-color: #C9242D;
    background-image: url("https://blogger.googleusercontent.com/img/b/R29vZ2xl/AVvXsEjWsz94quOI255erZ8OIGZxcP9Y7J6H9wCugBQFgmVhYF27Xxrl3ZEDZqt6p7Sa_n_m4aSYcbEAlsCcedI48YK-I4vUcSY2r0oxUAp-mm8J3IuLT3c7Lw4MYEApX60L_U5OL7ZTlQqusZ0/s24/0Bz2zRMjP8YuqTE1Sb21WSkNONUk.png");
}
.widget_socials a.instagram {
    background-color: #1B577D;
    background-image: url("https://blogger.googleusercontent.com/img/b/R29vZ2xl/AVvXsEg2o7yJ7sqZuaiDJlORQeQ2CT4hTG6m99nQ87vKg1o8Ri2AB9VYDs-tM2LW_fBjz2nVy9OAD_OvDSc4MzcEQMDJqfHd5lQTNknUtq_0W6Ab63w3Qu3F3xN0ctu0pc9Qazf6pPjE8HmKvME/s24/0Bz2zRMjP8YuqekJ0dmZtcmhQSms.png");
}
.widget.facebook_like_box .facebook_wrapper {
    padding: 11px 20px 15px;
}
.widget.facebook_like_box .fb_inner_wrapper {
    overflow: hidden;
}
.twitter_widget .tw_btn {
    padding-bottom: 20px;
    padding-left: 20px;
}
.twitter_widget em {
    color: #999999;
    font-size: 12px;
}
.flickr_widget .flickr_wrapper {
    padding: 20px 20px 7px;
}
.flickr_widget .flickr_wrapper .flr_wrapper_inner {
    overflow: hidden;
}
.flickr_widget .flickr_wrapper .flr_inner {
    margin-right: -13px;
}
.flickr_widget .flickr_wrapper a.flickr_item {
    display: block;
    float: left;
    height: 55px;
    margin-bottom: 13px;
    margin-right: 13px;
    text-decoration: none;
    width: 55px;
}
.flickr_widget .flickr_wrapper a.flickr_item img {
    border-radius: 2px 2px 2px 2px;
    box-shadow: 0 1px 1px rgba(0, 0, 0, 0.2);
    display: block;
    height: 55px;
    width: 55px;
}

.widget_newsletter.blue {
    background-color: #93D0EA;
}
.widget_newsletter.green {
    background-color: #80AA2A;
}
.widget_newsletter.red {
    background-color: #F4836A;
}
.widget_newsletter.black {
    background-color: #444444;
}
.widget_newsletter.pink {
    background-color: #E38ADB;
}
.widget_newsletter.orange {
    background-color: #F57E4B;
}
.widget_newsletter h3 {
    color: #FFFFFF;
    text-shadow: 0 1px 1px rgba(0, 0, 0, 0.3);
}

.widget_newsletter .newsletter_inner {
    background: url("https://blogger.googleusercontent.com/img/b/R29vZ2xl/AVvXsEhoDQge4IzoGJ_lxi1EJSZZymVFmITqcrXTebJG7YRbzUS-8mrD-PWXnOw_nPgpsDNcrHEH_y1Mc_sZ5QrVPGunnSwlY4AobbtDuuOZe0LaJb9UoaUf55KVuIr92sC37JBLVFFXYMvOKes/s114/0Bz2zRMjP8YuqVWo5dDBFSnVrdkE.png") no-repeat scroll right 20px transparent;
    padding: 25px 20px;
}

.widget_newsletter .letter_email {
    line-height: normal;
    margin-right: 5px;
    width: 200px;
}
.widget_newsletter .letter_submit {
    background: #666666;
}
.widget_newsletter {
    color: #FFFFFF;
}

input[type="text"], input[type="password"], input[type="email"], textarea, select {
    -moz-box-sizing: border-box;
    background: none repeat scroll 0 0 #F9F9F9;
    border: medium none;
    border-radius: 2px 2px 2px 2px;
    box-shadow: 0 1px 1px rgba(0, 0, 0, 0.2) inset;
    color: #888888;
    display: inline-block;
    font-size: 0.9em;
    line-height: 1em;
    margin: 0;
    max-width: 100%;
    outline: medium none;
    padding: 1em;
    width: 300px;
}
.button, .post_tag a, .tagcloud a, a.comment-reply-link, .form-submit #submit, input[type="submit"], input[type="button"] {
    background: url("images/button.png") repeat-x scroll center bottom transparent;
    border: medium none;
    border-radius: 2px 2px 2px 2px;
    box-shadow: 0 1px 1px rgba(0, 0, 0, 0.2);
    color: #FFFFFF !important;
    cursor: pointer;
    display: inline-block;
    font-size: 0.9em;
    font-weight: bold;
    line-height: 1em;
    outline: medium none;
    padding: 1em;
    text-decoration: none;
    text-shadow: 0 1px 1px rgba(0, 0, 0, 0.3);
    text-transform: uppercase;
}
.outer-most {width:320px;}
</style>

</td>
</tr>
</table></div>]
[/lock]

Customization


To make the widget work for you, update the highlighted code that corresponds to your social profiles, RSS/Feedburner feed link.

You can also remove and social media button from there by simply removing it's appropriate code. For example you wish to remove Facebook button, simply remove it's href link as below:

<a class="facebook" title="Facebook" href="FACEBOOK LINK"></a>

Thank You


It takes quite a bit of time to bring these widgets to you fellows, so I would appreciate if you would give the post a push on social media. It helps a lot.

Thanks again, Peace out.

You may like to see couple of other great Blogger widgets we published before too.

How To Add Multiple Author Bio Byline To Blogger


If you're running a multiple author blog on Blogger where you have a set number of authors, you can display a cute little Author Byline with profile image, name, short description and twitter follower button.

It's great to have such a short byline as the reader feels more attached to the content and engages far better. The widget can be used for multiple authors on your blog, though you have to add the details to the code manually.

Follow the simple steps below to add author bio byline below blogger post title.

Step #1 Add Your Author Details To The Code Bellow


Copy the following code to any text editor of your choice and replace the following tags as per your blog.

<b:if cond='data:post.author == &quot;First Author Name&quot;'>

<div class='sharetitle by-line by-line-inline'>
<a class='by-line-author-img' data-component='byLineDefault' data-ordinal='1' data-source='byLineDefault' data-type='authorId' href='First Author Profile Link'>
<img height='80' src='First Author Image Link' style='display:block;' width='85'/>
</a>
<div class='by-line-info' itemprop='author' itemscope='' itemtype='http://schema.org/Person'>
<a class='muted' data-component='byLineDefault' data-ordinal='1' data-source='byLineDefault' data-type='authorName' href='First Author Profile Link' rel='author'>
<div class='heading' itemprop='name'>By First Author Name</div>
</a>
<a class='muted' data-component='byLineDefault' data-ordinal='1' data-source='byLineDefault' data-type='authorSite' href='First Author Profile Link'>
<div class='site-expert'> First Author Description (e.g Founder BloggingeHow) </div>
  <br/>

<a class='twitter-follow-button' data-show-count='false' data-size='medium' href='https://twitter.com/TwitterUserName'>Follow @TwitterUserName</a>
<script>!function(d,s,id){var js,fjs=d.getElementsByTagName(s)[0];if(!d.getElementById(id)){js=d.createElement(s);js.id=id;js.src=&quot;//platform.twitter.com/widgets.js&quot;;fjs.parentNode.insertBefore(js,fjs);}}(document,&quot;script&quot;,&quot;twitter-wjs&quot;);</script>

</a>
</div>
</div>
</b:if>


<style>

 .site-expert{font-size:12px;}

.by-line {
    margin-bottom: 13px;
    margin-top: 4px;
}
.by-line .heading {
    margin: 0;
}
.by-line.by-line-inline .by-line-info {
    display: inline-block;
    vertical-align: top;
}
.by-line.by-line-inline .by-line-author-img {
    margin-right: 11px;
}
.by-line.by-line-stacked .by-line-author-img {
    margin-bottom: 14px;
}
.by-line.by-line-guestauthor {
    color: #989898;
    font-size: 15px;
    padding-top: 5px;
}
.by-line-author-img {
    border-radius: 100%;
    display: inline-block;
    margin-top: -0.38em;
    overflow: hidden;
    vertical-align: top;
}
.by-line-info {
    font-size: 15px;
    line-height: 17px;
}
.by-line-info a {
    display: block;
}

a.muted, a.muted:hover {
    color: #989898;
text-decoration:none;
}  </style>

Customization:


Now simply replace all the colored tags as per their description. You'd have to add the following details:

1- First Author Name
2- First Author Profile Link
3- First Author Image Link
4- First Author Description (e.g Founder BloggingeHow)
5- TwitterUserName

How To Add For Multiple Authors?


To implement it for more authors, simply paste more code for alternate authors as below:

<b:if cond='data:post.author == &quot;Author Name&quot;'>

<div class='sharetitle by-line by-line-inline'>
<a class='by-line-author-img' data-component='byLineDefault' data-ordinal='1' data-source='byLineDefault' data-type='authorId' href='Author Profile Link'>
<img height='80' src='Author Image Link' style='display:block;' width='85'/>
</a>
<div class='by-line-info' itemprop='author' itemscope='' itemtype='http://schema.org/Person'>
<a class='muted' data-component='byLineDefault' data-ordinal='1' data-source='byLineDefault' data-type='authorName' href='Author Profile Link' rel='author'>
<div class='heading' itemprop='name'>By Author Name</div>
</a>
<a class='muted' data-component='byLineDefault' data-ordinal='1' data-source='byLineDefault' data-type='authorSite' href='Author Profile Link'>
<div class='site-expert'> Author Description (e.g Founder BloggingeHow) </div>
  <br/>

<a class='twitter-follow-button' data-show-count='false' data-size='medium' href='https://twitter.com/TwitterUserName'>Follow @yourusername</a>
<script>!function(d,s,id){var js,fjs=d.getElementsByTagName(s)[0];if(!d.getElementById(id)){js=d.createElement(s);js.id=id;js.src=&quot;//platform.twitter.com/widgets.js&quot;;fjs.parentNode.insertBefore(js,fjs);}}(document,&quot;script&quot;,&quot;twitter-wjs&quot;);</script>

</a>
</div>
</div>
</b:if>


Step #2 Add The Final Code To Blogger


Now to add the code to Blogger, navigate to Blogger Dashboard >> Edit HTML and search for the following code:

<div class='post-header-line-1'/>

Finally, now paste the code beneath the one you found above. Hit save and Enjoy!

I hope the widget would give a refreshing look to your blog. Stay blessed.

How To Add a YouTube Subscription Widget To Blogger - 1 Step!

If you've a YouTube channel you'd definitely be willing to increase your audience and subscribers fast. There are couple of strategies for that and the most basic and logical is to create quality, well edited videos that people would like to see.

I'll leave that to another post, though for today, we can implement a subscription widget on our blogs/websites that would encourage your blog readers to subscribe to you if you're running a YouTube channel.

Lets get right into the steps that would help you add a YouTube subscription widget to your blogger blogs.

add youtube subscription widget to blogger

Step #1 Visit Your Blogger Layout


Navigate to Dashboard >> Layout of your Blogger blog, add a new HTML/JavaScript Widget section and copy/paste the copy below.

<iframe frameborder="0" id="fr" scrolling="no" src="http://www.youtube.com/subscribe_widget?p=AddYourYouTubeUserNameHere" style="overflow: hidden;height: 105px;width: 300px;border: 0"></iframe>

html javascript widget blogger bloggingehow


Simply replace the text in orange with your YouTube username and it's all ready. Hit Save and you're all done.

You may like to read now: Uploading Videos Directly To Facebook Vs Sharing YouTube Videos? - Which Gets More Interaction?

GIVEAWAY: BloggingeHow's Site-Wide Email Subscription Section (Feedburner + Aweber Version)

bloggingehow giveaway email subscription widget

 It's been quite a while we have done any giveaway here on BloggingeHow. Lately I've got pretty positive feedback on the featured post section that I used previously that is a site wide section meant to increase your email capture rate at your blog.

If you're currently not using any form of a featured section above fold to promote your email newsletter, you're loosing out a lot of money on the table.

Why Featured Section Is Must?


See, you'd by now already know how crucial it is to capture emails on your blog/website. The post 6 Reasons to Get Started With Aweber - You'd Be Foolish Otherwise goes into detail as to why you need to start capturing emails if you're not already in some form.

So we have a consensus here that you MUST turn your blog visitors into subscribers and most importantly 'email subscribers' as you can maintain a long term relation with them and provide them value effectively.

There have been tons of email subscription widgets I switched at BloggingeHow, and if you're a regular reader, you'd notice the changes that take place. Testing is a key with what ever widget that you implement, so I would switch to another one if I realize it's not serving the purpose.

You can checkout the posts: The History of Templates for BloggingeHow (From Ugly to Being Proud) where you can notice the changes that took place in the templates and widgets.

Giveaway: Tested Featured Post Section of BloggingeHow.


The featured section you see below is great for few reasons:

1- Stunning design

The design is so perfect and professional that it would give your blog an aesthetic boost overall too.

2- Features Image of your ethical bribe. 

That is any eBook cover, a course art, or it can be anything that you're giving away for free to encourage the visitors to subscribe.

3- Headline and Features section

You can add detailed features list and headline to your featured section as per your blog's niche.

4- Advanced 'Ask For It' strategy implemented.

This is that the widget hides the email subscription fields from the visitor as many would simply get turned down by have a feel that you're on a 'taking' side as oppose to the giving end.

So it incorporates a button that asks the user to click it to the download the free ethical bribe. Once the person would click the button, subscription fields would then fade out with some professional CSS implemented.

bloggingehow featured post section giveaway


How can you win? 5 Winners!


To make sure that you win you need to deliver maximum number of entries. Punchtab would let you know total number of entries you made. 

I'll be selecting the top 5 guys with most entries. So make sure you get as many entries you can via PunchTab tool below.


How to win 1 Entry


It will ask you to follow BloggingeHow on social media, to share this post and comment as to whether you like such giveaways. Each time you do so, you will earn 1 Entry.
Use PunchTab widget to get entries.

How to win 5 Entries at once


You can win 5 entries by sharing the link that you would see in the Punchtab application below.

Make sure that you share all the possible tasks and keep sharing the link in your social circle.

Its all about how much hard work you deliver. The more you share, the higher your chances are to win.

I'll show up the winner with his/her total number of entries once I announce the winners.

Best of luck guys!

Don't forget to comment as it will earn you extra entries.