Showing posts with label HowTo. Show all posts

Hangouts on Air YouTube: How to Use Hangouts on Air Using YouTube Live Event


YouTube lately debunked their Hangouts on Air feature that was previously a part accessible via Google Hangouts on Air feature of Google+ social media platform.  


Though lately, Google has been making moves to make that a part of YouTube platform its self, which is kind of what makes sense.
As Google+ didn't meet the expected goals and once again became a relative failure for Google in addition to all the previous social media platform launched by Google like Google Buzz etc.

Google since has been making Google+ as a part of Google for Work platform and might be just limiting the neglected social media platform just for business.

As the Hangouts on Air feature is embedded within YouTube Live feature, we'll see how one can still do live streaming just like before but taking few different steps.

Follow the simple steps below to proceed.

How to do live streaming using YouTube Live Hangouts on Air feature?

Step #1 Open YouTube Live Option in Creator Studio


Once you're into your Creator Studio, click Live Streaming >> Events options from the left sidebar.

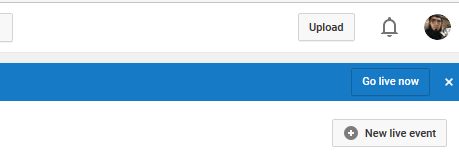
Once that's done, click 'New Live Event' Option from the right panel as shown in the image below.


After clicking that, you'd be taken to a very similar interface that you'd be used to while creating Google Hangouts on Air.

Here you simply set all the settings like Title, publishing time, tags etc just like you would do in Google Hangouts on Air. In addition to this, all simply choose the radio button from the right side as shown in the image below that would select the settings as Google Hangouts on Air instead of custom settings.

Once that's all done, simply proceed as normal.

Hope that was helpful for you. Do let me know if you have any particular questions down below in the comment section.

How to Embed YouTube Playlist Player App?

Now you can embed YouTube's Playlist Player App in your website or a blog <3

If you were looking to embed YouTube like playlist player on your blog or a website than this is the perfectly working solution for you that you'll get in love with.

If you're figuring out what it looks like, you can checkout the demo below on my About page.


By Default, YouTube doesn't allow the to embed the 'exact' Playlist player that it uses for it's self just as what you see in the image below.

YouTube playlist player app

What you can embed though is a different design of the playlist player like below though that's not we actually look forward to :) SO lets see how you can embed the actual great one that I shared above in the demo.

default YouTube playlist player

Installation Requirements

 1. You Need Your WebHosting where you can deploy the scripts

  • [message] 
    • Don't Have Web Hosting?
      • If not, do comment below if you're using Blogger blogs and would like to see how you can add this to Blogger blogs. I would then go ahead and share how you can do that for Blogspot. InshaAllah.
        Currently the tutorial targets if you've an access to your own web hosting. If you do, then you can use it on a Blogger blog too, as the scripts would be hosted there.

Step #1 Download The App/Plugin

Simply head over to the following link and download the plugin. Once you have the zip file, you'd then have to make few changes in the Javascript code to include your YouTube player's playlist ID and YouTube Channel ID.


Step #2 Find Your Channel and Playlist IDs


Finding Your Desired YouTube Playlist IDs


To show your desired playlist videos in this player, you need the playlist IDs that YouTube gives you. You can find them as below.

1. Go to YouTube playlist of your choice and copy it's ID as shown in the image below.

youtube playlist player ID

2. Now simply find out your YouTube channel ID as shown in the image below. You can go to advanced account settings page and there you'll find it.

youtube channel ID

Once you have both of these things, you're all set to edit these out in the YouTube plugin code.


Step #3 Edit The Script as Mentioned Below.

Open up ytv.js file in any file editor on your computer (like Notepad++) and make the following changes as mentioned below in the image. Notice that I highlighted the playlist IDs that you want to show in the Plugin. You can add one or more.


Once you edit out that part. You're almost done. I'll tell you where and how to add these scripts to make them work. Simply follow the next step.

Step #4 Upload the Plugin Folder to Your Hosting


1. Now that you have edited that out, simply upload the plugin folder to your directory. Javascript and css file.


2. Simply add both the files in your header area of the template/page as shown below.


3. Now simply place the following code where you want the widget/plugin to appear.


Note that, where it says "channelId", you've to enter the previous noted down 'channelID' of yours.

That's all!

Once you do that, save the files you edited in your file manager of hosting and you're good to go.

Hope that was helpful for you.

Conclusion - Need Any Help?


In case you found anything confusing, you can always get back to me in the comments section of this and I would love to solve that. If you're willing to add that to a Blogger blog, do comment below, and I'll update this article for Blogger blogs too.

Best of luck! Enjoy this amazing plugin :)